时间已经是2023年了,马上也2024年了,自己去Web3世界闯荡已经一年多了。记得两年前在写文章的时候,发现自己对新领域的狂热在减弱,但是经过在新领域的锤炼,仿佛换起来自己的新狂热程度。时过境迁,React十周年了,Nextjs v13发布也一年了,App Dir(App router)模式的出现,对于自己的吸引力非常大,刚出没多久就在研究和完善相关的工程化,而今经过在企业化项目的实践里,已经锤炼出了一套自认为可以使用的Starter和经验积累。正值1024节,特为大家献上一片总结!
可以配合我总结并且近期也更新的一个starter项目进行理解哟:nextjs-web3-starter
Nextjs介绍和它自v13版本的技术的改进 Nextjs是一个React的元框架 Nextjs在我的印象里是SSR框架,最初使用v12时,了解其SSG概念。之后深入了解,是一个很不错的全干元框架。2022年v13版本发布,beta版本出来的App Dir,当时是这样叫它的,后来定义为APP Router。这种结合React Server Components范式和React Suspense,让人着迷。当时beta版就开始研究并且引入到正式项目里。后来Turbopack的出现,更让人兴奋,但初时由于Turbopack不够完善,许多包都没法兼容,后来提Issue,改包引用或者自己手撸代码造轮子替代,最后剩下的老大难aws的sdk无法兼容也被手撸代码替代了,最后Nextjsv13+Turbopack,开发体验非常爽!如果遇见不兼容Turbopack的包,建议沉下心手撸替代或者是提交PR。
React Server Components React Server Components(简称RSC)是一种全新范例的名称,我们可以创建专门在服务器上运行的组件。这使我们能够在 React 组件中执行诸如编写数据库查询之类的操作。传统的react组件被叫做client组件,在RSC上,默认情况下所有组件都被假定为服务器组件。当然服务器组件更多需要结合编译工具才能发挥它的特性,所以Nextjs天生适合做这一块东西。可以结合这两篇文章去了解RSC和Nextjs是如何做的:Making Sense of React Server Components / Nextjs Server Components 。
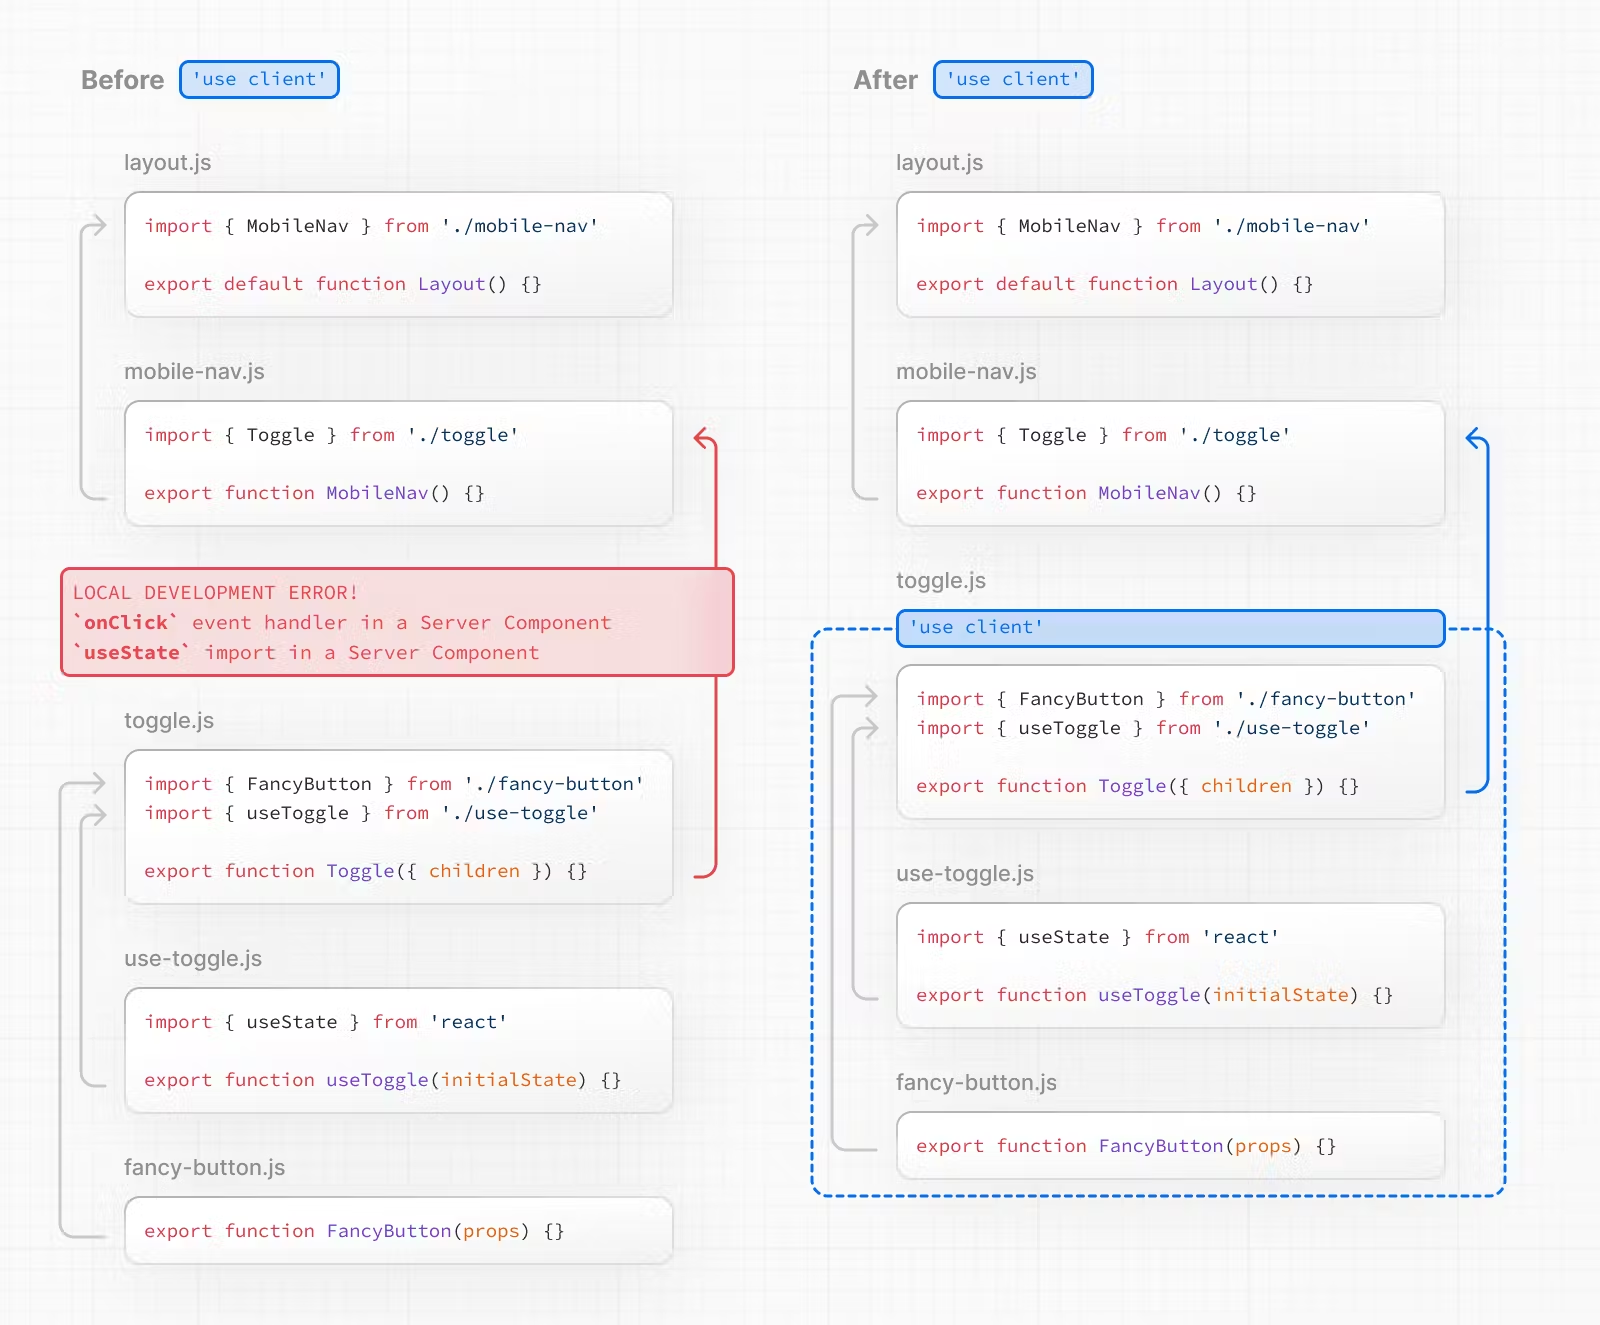
在处理RSC的时候,最让人困惑的应该就是它的边界状态问题了,应该不少小伙伴第一次来看这个RSC的时候,都会产生疑惑,Server和Client组件嵌套后的是否会重新渲染问题,状态变量如何保存和变更等等。当然请注意,React有这些规则:客户端组件无法渲染服务器组件,服务器组件永远不会重新渲染。所以有状态的hooks是在client组件里进使用的。在server组件里,无法使用useEffect和useStae等。Server组件传递的props也是不变的。
但是当涉及到这种边界时,父子组件的关系就不那么重要了,可以通过父子组件来进行拆分和处理状态量。我们来看看Nextjs是怎么做的:Nextjs结合Suspense,服务器组件呈现为一种特殊的数据格式,叫做React 服务器组件有效负载(简称RSC Payload),然后结合Client JavaScript指令在服务器组合成Html。
1 2 3 4 5 self.__next ['$1024' ] = { type : 'p' , props : null , children : "Hello world!" , };
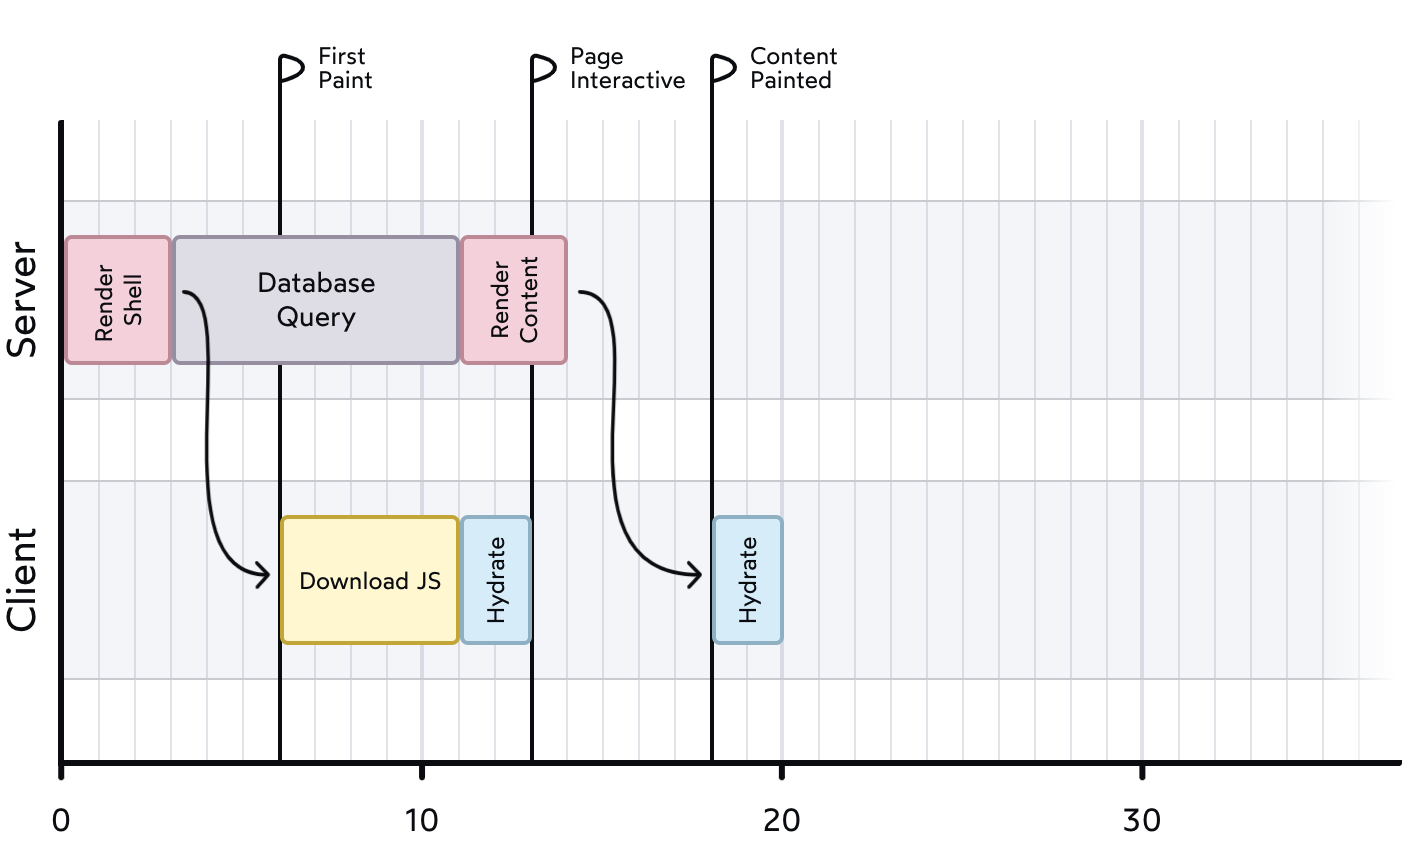
然后在客户端:HTML用于初始页面加载,然后RSC Payload协调客户端和服务器组件树,并更新 DOM,JavaScript指令用于水合客户端组件并使应用程序具有交互性。结合Streaming流式传输,性能优化明显,服务器组件不包含在我们的JS包中,这减少了需要下载的JavaScript数量以及需要水合的组件数量,大大提升了性能和加载速度!
Nextjs工程化技术栈和架构 了解了Nextjs v13+的新特性,我们来聊聊Nextjs工程化的一些事吧。
Nextjs工程化技术栈 大致可以根据传统的工程化领域划分为如下:
编程语言:TypeScript 5.x
构建工具:Nextjs Turbpack + Webpack
前端框架:Nextjs
路由工具:Nextjs文件路由
状态管理:React Context
CSS:Tailwindcss+ Postcss
HTTP 工具:Fetch
国际化:Nextjs Middleware + intl-localematcher + negotiator
多环境:ENV Config
数据库ORM:Prisma
Git Hook 工具:Husky + Lint-staged
代码规范:EditorConfig + Prettier + ESLint
提交规范:Commitlint
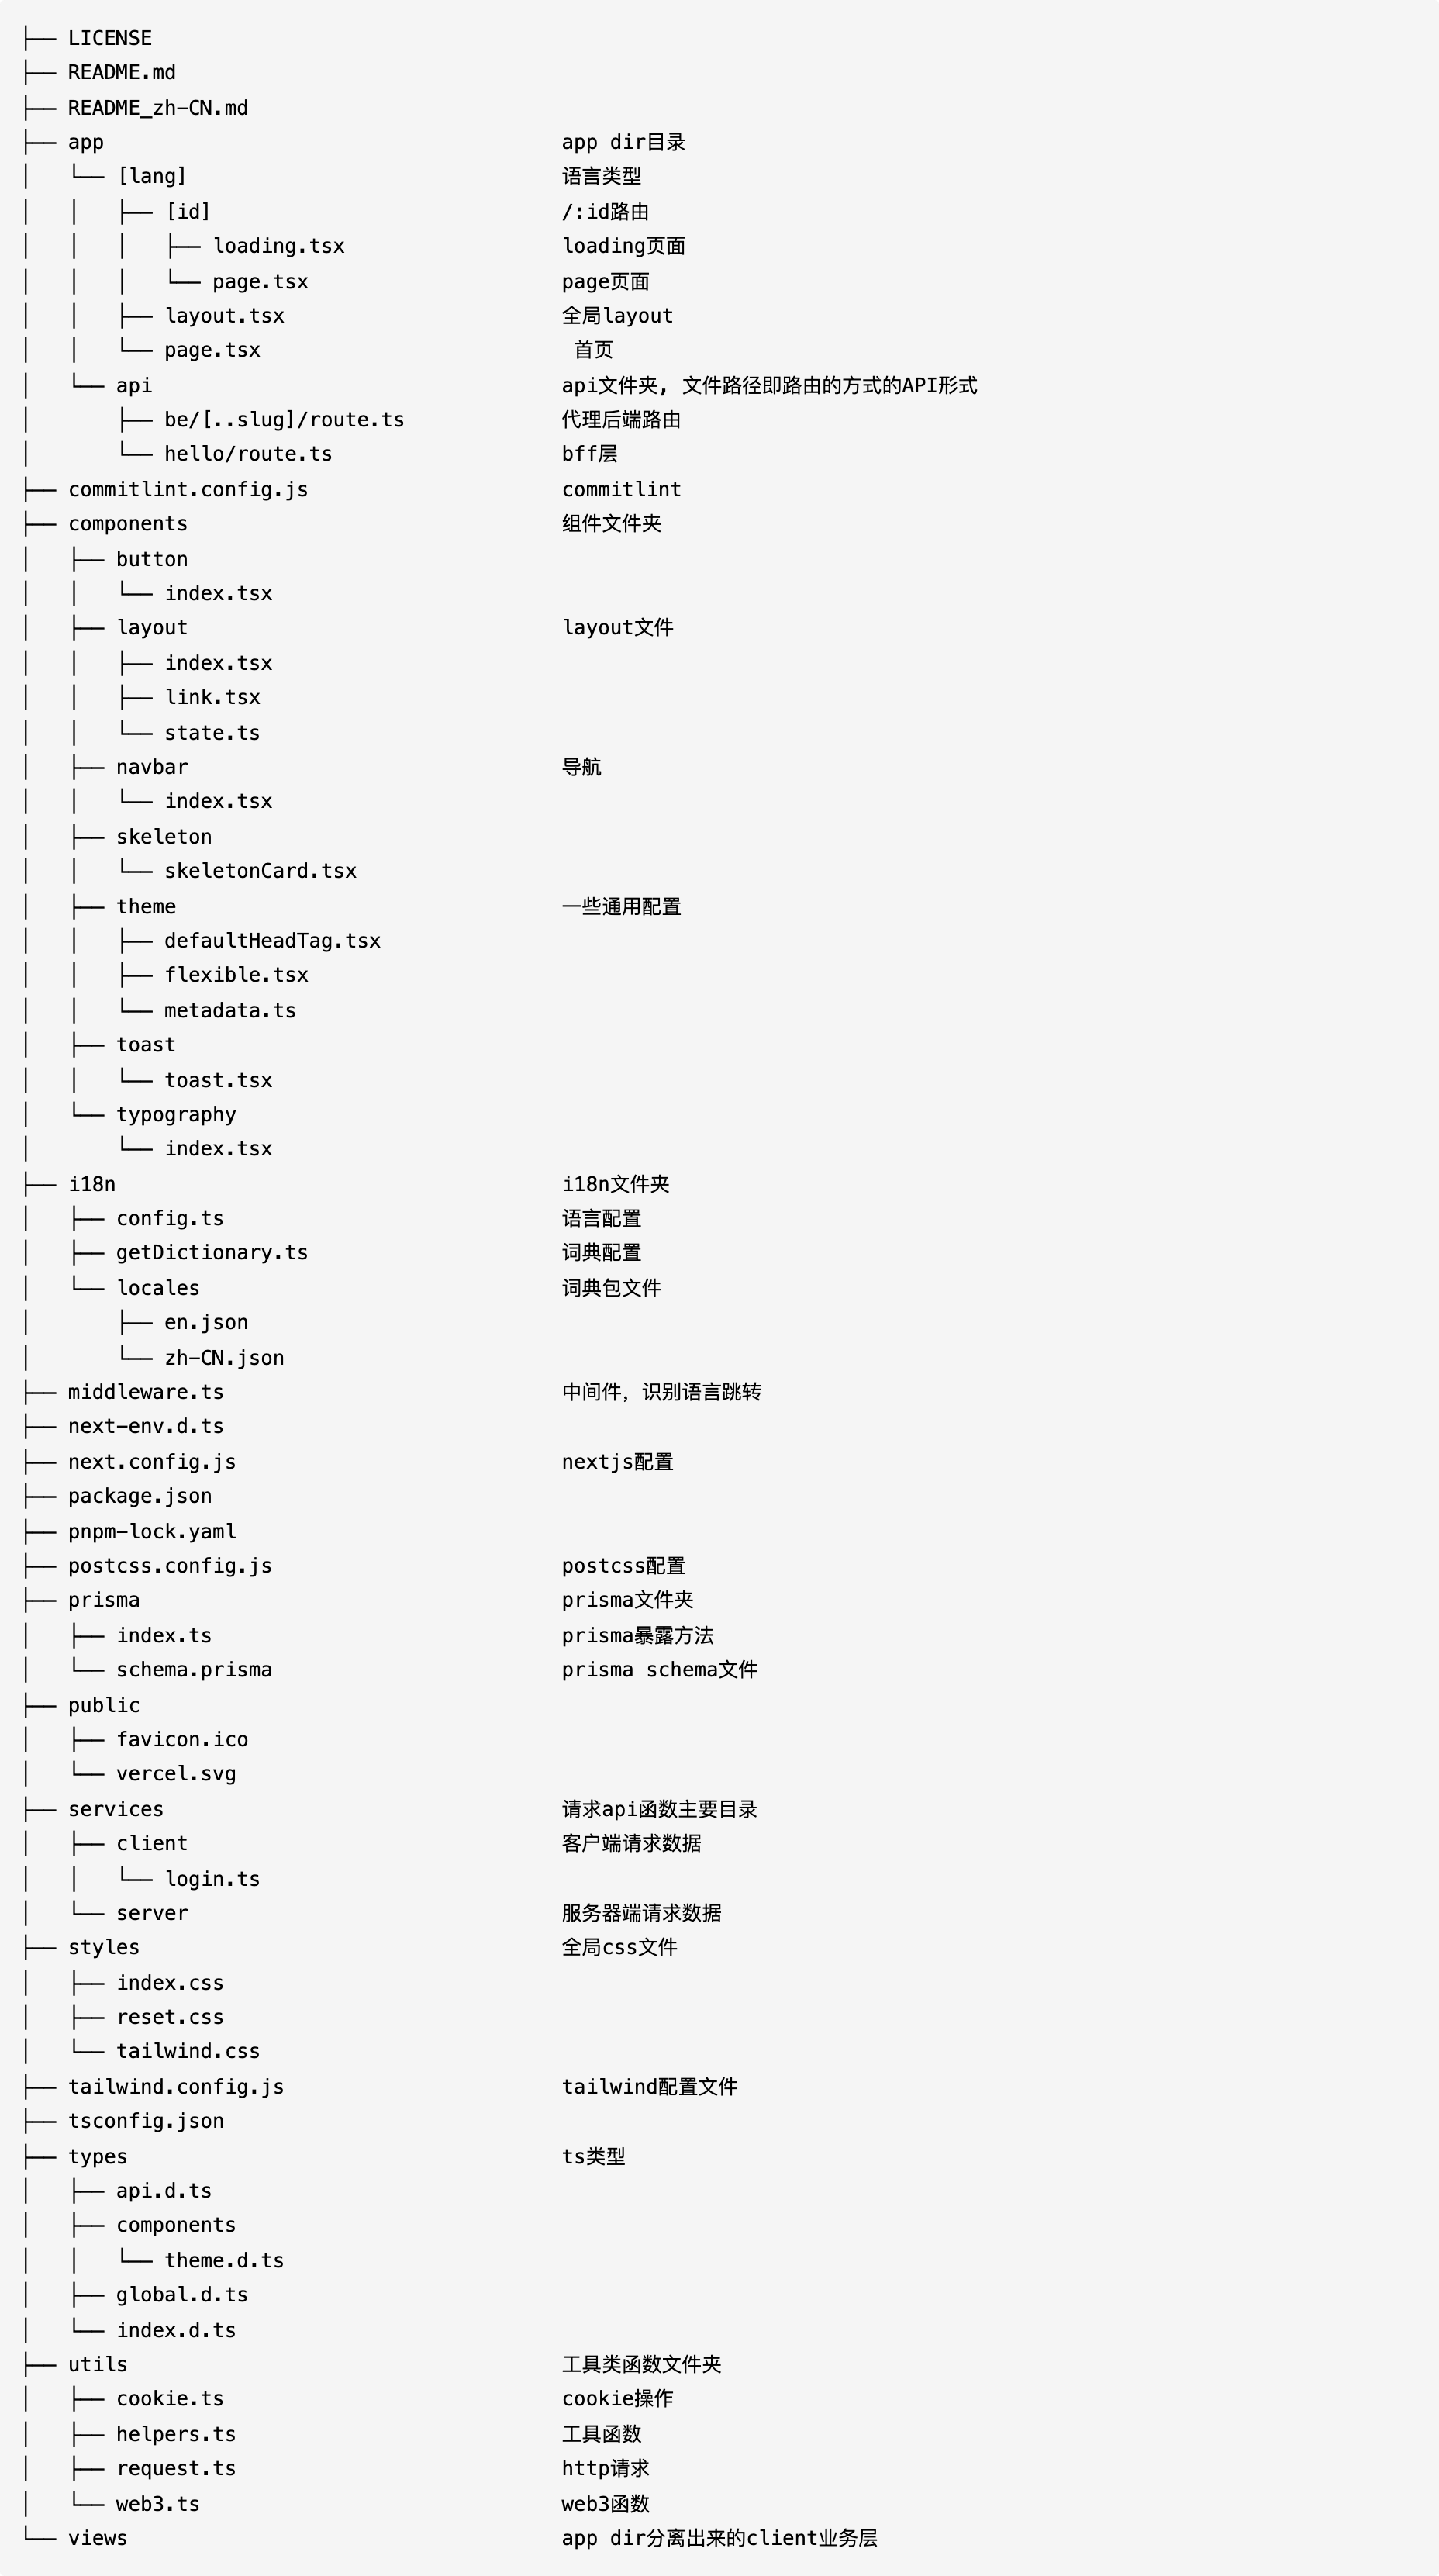
Nextjs工程化目录结构
Nextjs 工程化的一些其他细节 关于API请求 这里使用了fetch进行请求,服务端请求和客户端请求保持了一致性。
1 2 3 4 5 6 7 8 9 10 11 12 13 14 15 16 17 18 import { cookies } from 'next/headers' ;export const nextFetchGet = async (api: string ) => { const nextCookies = cookies (); const token = nextCookies.get ('token' ) || '' ; const role = nextCookies.get ('role' ); const roleId = nextCookies.get ('roleId' ); const url = `${process.env.BASE_FETCH_URL} /api/be${api} ` ; const res = await fetch (url, { headers : token ? { Authorization : 'Bearer ' + token } : {} }); if (!res.ok ) { throw new Error ('Failed to fetch data' ); } return res.json (); };
1 2 3 4 5 6 7 8 9 10 11 12 13 14 15 16 17 18 19 20 21 22 23 24 25 26 27 28 29 30 31 32 33 34 35 36 37 38 39 40 41 42 43 44 45 46 47 48 49 50 51 52 53 54 55 56 57 58 59 60 61 62 63 64 65 66 67 68 69 70 71 72 73 74 75 76 77 78 79 80 81 82 83 84 85 86 87 88 89 90 91 92 93 94 95 96 97 98 99 100 101 102 103 104 105 106 107 108 109 110 111 112 113 114 115 116 117 118 119 120 import { getCookie } from './cookie' ;import { getApiUrl } from './helpers' ;interface RequestOptions extends RequestInit { responseType?: | 'TEXT' | 'JSON' | 'BLOB' | 'ARRAYBUFFER' | 'text' | 'json' | 'blob' | 'arraybuffer' ; body?: any ; } const request = async (url: string , config?: RequestOptions ) => { const finalUrl : string = getApiUrl (url); const inital : RequestOptions = { method : 'GET' , body : null , headers : { 'Content-Type' : 'application/json' , Authorization : getCookie ('token' ) ? 'Bearer ' + getCookie ('token' ) : '' }, credentials : 'include' , cache : 'no-cache' , mode : 'cors' , responseType : 'JSON' }; const configs : RequestOptions = { ...inital, ...config }; if (config && config.headers ) configs.headers = { ...inital.headers , Authorization : getCookie ('token' ) ? 'Bearer ' + getCookie ('token' ) : '' , ...config.headers }; const finalConfig : RequestInit = { method : configs.method ?.toUpperCase (), credentials : configs.credentials , mode : configs.mode , cache : configs.cache , headers : configs.headers , body : configs.body }; return fetch (`${finalUrl} ` , finalConfig) .then ((response: Response ) => { const { status } = response; if (status >= 200 && status < 400 ) { let result : any ; switch (configs.responseType && configs.responseType .toUpperCase ()) { case 'TEXT' : result = response.text (); break ; case 'JSON' : result = response.json (); break ; case 'BLOB' : result = response.blob (); break ; case 'ARRAYBUFFER' : result = response.arrayBuffer (); break ; default : result = response.json (); } return result; } return Promise .reject (response); }) .catch ((reason: any ) => { if (typeof window !== 'undefined' && navigator && !navigator.onLine ) { console .log ('Your network is break!' ); } if (reason && reason.status ) { switch (reason.status ) { case 400 : console .log ('Please verify your info!' ); break ; case 401 : console .log ('Please Login!' ); break ; case 403 : console .log ('You have no access to this' ); break ; case 500 : console .log ("Oops, there's something wrong!" ); break ; case 504 : console .log ("Oops, there's something wrong!" ); break ; default : } } else { console .log ("Oops, there's something wrong!" ); } return Promise .reject (reason); }); }; export default request;
关于代理API问题 这里看自己需要,如果Nextjs的资源不及后端接口,还是不建议直接代理所有接口,只需要编写服务器组件所需要的接口代理就行了。如果需要全局代理后端接口,可以使用rewrites的方式,不建议使用以前proxy包的方式了:
1
2
3
4
5
6
7
8
9
10
11
12
const nextConfig = { rewrites : () => { return [ { source : '/api/be/:slug*' , destination : `${process.env.BACKEND_URL} /api/:slug*` } ]; } };
Nextjs 国际化 使用了Nextjs中间件模式和intl-localematcher + negotiator进行国际化处理的,由于nextjs版本的更新导致输出的结构变化,所以中间件随着版本更新需要进行维护,如果在生产上版本更新需要注意,最新版中间件如下:
1 pnpm add @formatjs/intl-localematcher negotiator
1 2 3 4 5 6 7 8 9 10 11 12 13 14 15 16 17 18 19 20 21 22 23 24 25 26 27 28 29 30 31 32 33 34 35 36 37 38 39 40 41 42 43 44 import { NextResponse } from 'next/server' ;import type { NextRequest } from 'next/server' ;import { i18n } from '@/i18n/config' ;import { match as matchLocale } from '@formatjs/intl-localematcher' ;import Negotiator from 'negotiator' ;function getLocale (request: NextRequest ): string | undefined { const negotiatorHeaders : Record <string , string > = {}; request.headers .forEach ((value, key ) => (negotiatorHeaders[key] = value)); const languages = new Negotiator ({ headers : negotiatorHeaders }).languages (); const locales : string [] = i18n.locales as unknown as string []; return matchLocale (languages, locales, i18n.defaultLocale ); } export function middleware (request: NextRequest ) { const pathname = request.nextUrl .pathname ; const pathnameIsMissingLocale = i18n.locales .every ( (locale ) => !pathname.startsWith (`/${locale} /` ) && pathname !== `/${locale} ` ); if (pathnameIsMissingLocale) { const locale = getLocale (request); return NextResponse .redirect ( new URL (`/${locale} ${pathname === '' ? '/' : pathname} ` , request.url ) ); } } export const config = { matcher : '/((?!api|static|.*\\..*|_next).*)' };
我们配置获取语言和数据,目前由于Turbopack的一些bug,导致需要使用如下方式引用json:
1 2 3 4 5 6 7 8 9 10 11 12 13 14 15 16 17 18 19 20 21 22 23 24 import 'server-only' ;import type { Locale } from './config' ;import enJson from '@/i18n/locales/en.json' assert { type : 'json' };import zhCNJson from '@/i18n/locales/zh-CN.json' assert { type : 'json' };const dictionaries = { en : () => enJson, 'zh-CN' : () => zhCNJson }; export const getDictionary = async (locale: Locale ) => dictionaries[locale]();
1 2 3 4 5 6 7 8 export const i18n = { defaultLocale : 'en' , locales : ['en' , 'zh-CN' ] } as const ; export type Locale = (typeof i18n)['locales' ][number ];
Nextjs PWA 参考目前市面上的Nextjs PWA插件,目前采取了@ducanh2912/next-pwa,需要修改next.config.js,参考如下,具体细节和定义可以看包文档:
1 2 3 4 5 6 7 8 9 10 11 12 13 14 const withPWA = require ('@ducanh2912/next-pwa' ).default ({ dest : 'public' , cacheOnFrontEndNav : true , aggressiveFrontEndNavCaching : true }); const nextConfig = { reactStrictMode : true , }; module .exports = withPWA (nextConfig);
请注意,需要在public目录配置mainfest.json
同时layout.tsx记得引入mainfest.json
1
2
3
4
5
6
7
8
9
10
11
12
13
14
15
16
17
18
19
20
21
22
23
24
import { Metadata } from 'next' ;export async function generateMetadata (Promise <Metadata > { return { ...DefaultMetadata , title : 'Create Next App' , description : 'Generated by create next app' , applicationName : 'vadxq' , manifest : '/mainfest.json' , themeColor : '#FFFFFF' , appleWebApp : { capable : true , statusBarStyle : 'default' , title : 'vadxq' }, formatDetection : { telephone : false }, icons : { shortcut : '/favicon.ico' , apple : [{ url : '/favicon.ico' , sizes : '180x180' }] } }; }
对了,会自动生成一堆文件在public目录下,本地开发的话建议将这些添加到gitignore下:
1
2
3
public/sw.js public/swe-worker-* public/workbox-*
关于Nextjs环境区分变量 这里建立使用env环境变量来控制,同时增加本地.env.local配置,进行gitignore忽略,这样大家可以愉快的修改配置文件调试。
关于Nextjs包引入优化 近期Nextjs v13.5+版本更新了,更新了一部分Nextjs配置,在experimental配置项中,增加了optimizePackageImports配置,可以进行包优化!同时更新优化了性能,可以查看此文阅读最新信息Next.js 13.5
关于Nextjs的全局变量 可以使用React的createContext提供,然后通过父子组件嵌套,使其在Client端水合产生作用。这里提供一份代码,用于触发路由进行loading加载进度条的demo,供参考:
1 2 3 4 5 6 7 8 'use client' ;import { createContext } from 'react' ;const StartRouterChangeContext = createContext<() => void >(() => {});export default StartRouterChangeContext ;
1 2 3 4 5 6 7 8 9 10 11 12 13 14 15 16 17 18 19 20 21 22 23 24 25 26 27 28 29 30 31 32 33 34 35 'use client' ;import Link from 'next/link' ;import { useContext } from 'react' ;import StartRouterChange from './state' ;export default function LayoutLink ({ href, style, children, className }: React.ComponentProps<'a' > ) { const startChange = useContext (StartRouterChange ); const useLink = href && href.startsWith ('/' ); if (useLink) return ( <Link href ={href} className ={className} onClick ={() => { const { pathname, search, hash } = window.location; if (href !== pathname + search + hash) startChange(); }} style={style} > {children} </Link > ); return ( <a href ={href} style ={style} className ={className} > {children} </a > ); }
1 2 3 4 5 6 7 8 9 10 11 12 13 14 15 16 17 18 19 20 21 22 23 24 25 26 27 28 29 30 31 32 33 34 35 36 37 38 39 'use client' ;import { useCallback, useEffect, useState } from 'react' ;import { usePathname, useSearchParams } from 'next/navigation' ;import NProgress from 'nprogress' ;import StartRouterChangeContext from './state' ;function RouterEventWrapper ({ onStart = () => null , onComplete = () => null , children }: React.PropsWithChildren<{ onStart?: () => void ; onComplete?: () => void }> ) { const [isChanging, setIsChanging] = useState (false ); const pathname = usePathname (); const searchParams = useSearchParams (); useEffect (() => setIsChanging (false ), [pathname, searchParams]); useEffect (() => { if (isChanging) onStart (); else onComplete (); }, [isChanging]); return ( <StartRouterChangeContext.Provider value ={() => setIsChanging(true)}> {children} </StartRouterChangeContext.Provider > ); } export default function RootLayout ({ children }: React.PropsWithChildren ) { const onStart = useCallback (() => NProgress .start (), []); const onComplete = useCallback (() => NProgress .done (), []); return ( <RouterEventWrapper onStart ={onStart} onComplete ={onComplete} > {children} </RouterEventWrapper > ); }
关于日志收集 目前有vercel的日志收集和第三方的Sentry。
Sentry直接使用Sentry提供的插件即可。
关于Nextjs操作数据库 我的starter提供了Prisma的调用案例,当然注释了,需要进行以下操作:
1
2
pnpm add @prisma/client pnpm add -D prisma
1
2
3
4
"script" : { "prisma:push" : "npx prisma db push" , "prisma:generate" : "npx prisma generate" , }
1
2
3
experimental : { serverComponentsExternalPackages : ['@prisma/client' ] },
1 2 3 4 5 6 7 8 9 10 11 12 13 14 15 16 import { PrismaClient } from '@prisma/client' ;const globalForPrisma = global as unknown as { prisma : PrismaClient };export const prisma = globalForPrisma.prisma || new PrismaClient ();if (process.env .NODE_ENV !== 'production' ) globalForPrisma.prisma = prisma;export default prisma;
1
2
3
4
5
6
7
8
9
10
11
12
13
14
15
16
17
18
19
20
21
22
23
24
25
26
27
28
29
// prisma/schema.prisma // This is your Prisma schema file, // learn more about it in the docs: https://pris.ly/d/prisma-schema generator client { provider = "prisma-client-js" } datasource db { provider = "mysql" url = env("DATABASE_URL") } model Post { id String @id @default(cuid()) title String content String? @db.LongText published Boolean @default(false) comments Comment[] @@map(name: "posts") } model Comment { id String @id @default(cuid()) content String? post Post? @relation(fields: [postId], references: [id]) postId String? published Boolean @default(false) }
然后就可以愉快的使用了Prisma orm进行操作数据库啦!其他细节可以查看Prisma文档!
关于 Nextjs持续集成和部署 Nextjs部署最佳方式也许就是Vercel了。但是各大云服务平台也可以,包括AWS在内对于Nextjs进行了优化,访问速度非常不错。
如果是个人项目或者是付费团队项目可以直接使用vercel进行部署。如果是想使用自己的Action或者是自己的部署平台进行部署上传到vercel,以下提供一个action yaml仅供参考:
1 2 3 4 5 6 7 8 9 10 11 12 13 14 15 16 17 18 19 20 21 22 23 24 25 26 27 28 29 30 31 32 name: Production Deployment env : VERCEL_ORG_ID: ${{ secrets.VERCEL_ORG_ID } } VERCEL_PROJECT_ID: ${{ secrets.VERCEL_PROJECT_ID } } on: push: branches: [main] jobs : build: runs-on: ubuntu-latest steps: - uses: actions/checkout@v2 - name: Install Vercel CLI run: npm install --global vercel@canary - uses: pnpm/action-setup@v2 with: version: latest - uses: actions/setup-node@v3 with: node-version: 18 cache: 'pnpm' - name: Pull Vercel Environment Information run: vercel pull --yes --environment=production --token=${{ secrets.VERCEL_TOKEN } } - name: Build Project Artifacts run: vercel build --prod --token=${{ secrets.VERCEL_TOKEN } } - name: Deploy Project Artifacts to Vercel run: vercel deploy --prebuilt --prod --token=${{ secrets.VERCEL_TOKEN } }
限制pnpm工具 1 2 3 4 "scripts" : { "preinstall" : "npx only-allow pnpm" , }
关于Husky/lint-staged 配置在提交代码前进行代码检测是非常重要的!
1 2 pnpm add -D husky lint-staged pretty-quick
配置检测,在根目录下的.husky下需要配置命令,可以参考demo
1 2 3 4 5 6 7 "scripts" : { "prepare" : "husky install" , "lint:lint-staged" : "lint-staged -c ./.husky/lintstagedrc.js" , "lint:pretty" : "pretty-quick --staged" , "lint" : "pnpm lint:lint-staged && pnpm lint:pretty" , }
.husky目录下文件
1 2 3 4 5 6 7 8 module .exports = { '*.{js,jsx,ts,tsx}' : ['eslint --fix' , 'prettier --write' ], '{!(package)*.json}' : ['prettier --write--parser json' ], 'package.json' : ['prettier --write' ], '*.vue' : ['eslint --fix' , 'prettier --write' , 'stylelint --fix' ], '*.{vue,css,scss,postcss,less}' : ['stylelint --fix' , 'prettier --write' ], '*.md' : ['prettier --write' ] };
1 2 3 4 5 6 7 8 9 10 11 #!/bin/sh . "$(dirname "$0 " ) /_/husky.sh" . "$(dirname "$0 " ) /common.sh" [ -n "$CI " ] && exit 0 npm run lint:lint-staged npm run lint:pretty
1 2 3 4 5 6 7 8 9 #!/bin/sh command_exists command -v "$1 " >/dev/null 2>&1 } if command_exists winpty && test -t 1; then exec < /dev/tty fi
关于配置commitlint检测 使用了@commitlint/cli和@commitlint/config-conventional,配置文件为:commitlint.config.js,
1 2 pnpm add -D @commitlint/cli @commitlint/config-conventional
1 2 3 4 5 6 7 8 9 10 11 12 13 14 15 16 17 18 19 20 21 22 23 24 25 26 27 28 29 30 31 32 module .exports = { ignores : [(commit ) => commit.includes ('init' )], extends : ['@commitlint/config-conventional' ], rules : { 'body-leading-blank' : [2 , 'always' ], 'footer-leading-blank' : [1 , 'always' ], 'header-max-length' : [2 , 'always' , 108 ], 'subject-empty' : [2 , 'never' ], 'type-empty' : [2 , 'never' ], 'type-enum' : [ 2 , 'always' , [ 'feat' , 'fix' , 'perf' , 'style' , 'docs' , 'test' , 'refactor' , 'build' , 'ci' , 'chore' , 'revert' , 'wip' , 'workflow' , 'types' , 'release' ] ] } };
然后结合husky配置进行检测,配置文件为commit-msg:
1 2 3 4 5 6 #!/bin/sh . "$(dirname "$0 " ) /_/husky.sh" npx --no-install commitlint --edit "$1 "
生成commit log文件 使用了conventional-changelog和@commitlint/cli然后使用生成log文件
1 2 3 4 "scripts" : { "log" : "npx conventional-changelog --config ./node_modules/@commitlint/cli -i CHANGELOG.md -s -r 0" }
总结 好了,这次的总结就到此结束了。Nextjs在正式项目上,几乎毫无压力,工程化的沉淀也差不多就这样啦,具体的业务表现就自由发挥啦。
今天是2023年的1024~在此祝所有程序员节日快乐~我们的狂欢🎉!献给2023-1024的礼物!
by: vadxq
2023.10.24 shanghai
参考文章:https://www.joshwcomeau.com/react/server-components https://nextjs.org/docs/app/building-your-application/rendering/server-components